

From the Boost Your BIM website:
#RTCEUR Wish #1: #Revit Change Tracking
Dieter asked “What about a tool that can help you tracking changes in your #Revit model. E.g. select elements that were affected by an indicated change. Eg after updating model from RSA. Maybe a dialog showing the history”
If you want to log every change made to your Revit model and what elements are affected by that change, the DocumentChanged event is what you need.
The code below outputs the time, user name, transaction name, and all added, modified, and deleted elements for each transaction.
For a real application you might want to write this data to a database instead of a text file, and build a viewer to get more info about the added and modified elements based on their element ids.
For the source code, see this article
#RTCEUR API Wish 2: Override display by element ids (isolate)
@DigDesRev asked “so clash detection gives a report w/ element IDs, can we review the report and on 1 view, override the display settings?”
The simplest way to visualize these elements is with Revit’s ‘Temporary Hide/Isolate’ tool
For the source code, see this article
#RTCEUR Wish 2: Override graphics by Element
Increasing the complexity a bit from the previous post, this sample shows how to Override Graphics by Element. In this case, the cut & project line weight and color are overridden in the active view for the specified elements.
For the source code, see this article
#RTCEUR Wish 2: Override element display by View Filters
To conclude this set of 3 posts showing how to override display of elements, this shows how to create a view filter for elements with a Comments instance parameter equal to “override”. The list of element ids is used to set this instance parameter. A view filter is created and set to use this rule, the view filter is applied to the view, and the graphics of this filter is overridden.
For the source code, see this article
#RTCEUR Wish 3: Scheduling adaptive point location values
Brian asked how to schedule the location value for placement points in adaptive components.
In a post at https://boostyourbim.wordpress.com/2013/02/14/set-adaptive-component-parameter-values-with-placement-point-coordinates/ I showed how user-defined parameters can be automatically updated with XYZ values of adaptive component points.
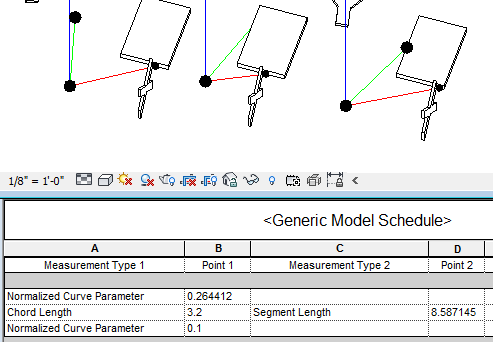
If instead what you’d like to do is schedule point parameters such as Measurement Type, Chord Length, and Measure From, the workflow could be something like this:
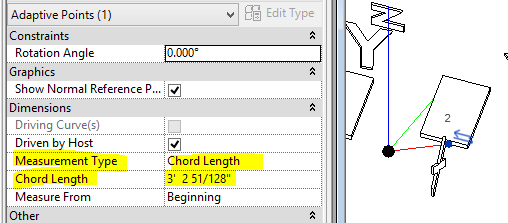
- Create user parameters for each point for each of these parameters
- Measurement Type 1
- Point Location 1
- Measurement Type 2
- Point Location 2
- etc
- Use the API to set these values for every family instance
- Use dynamic model update to:
- automatically update these user parameters any time the reference point parameters change
- automatically update the reference point parameters any time the user parameters change
This code does step 2 listed above. The approach for Step 3 is covered in the post linked above.
You will note that the Measurement Type is stored internally as an integer and we need to convert from that integer to the corresponding string (Chord Length, Segment Length…) so that we can get the length value from the parameter of the same name.
For the source code, see this article
Related
- RTC 2016 EUR – Boost Your BIM's Harry Mattison Granted Revit API Wishes
- RTC 2016 NA – Boost Your BIM's Harry Mattison Granted Revit API Wishes
- RTC 2015 EUR – Boost Your BIM's Harry Mattison Granted Revit API Wishes
- RTC 2015 NA – Boost Your BIM's Harry Mattison Granted Revit API Wishes
- RTC 2014 NA – Boost Your BIM's Harry Mattison Granted Revit API Wishes
- AU2013 – Boost Your BIM's Harry Mattison Granted Revit API Wishes
- RTC 2013 EUR – Boost Your BIM's Harry Mattison Granted Revit API Wishes
- RTC 2013 NA – Boost Your BIM's Harry Mattison Granted Revit API Wishes
No comments:
Post a Comment